
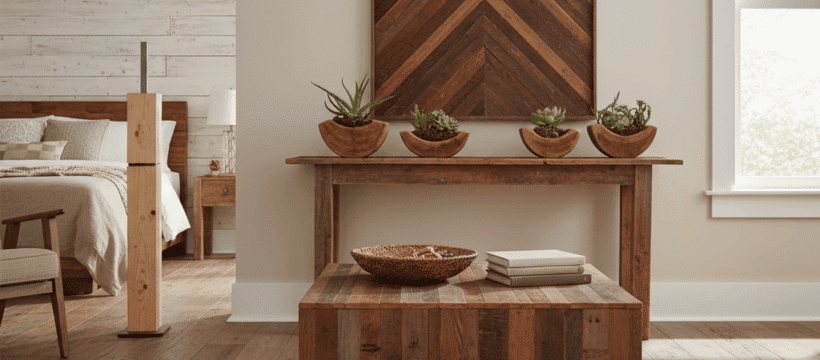
Old hardwood boards give a warm, homey vibe and a special kind of charm new wood just doesn’t have. When those old boards come up, they show wood filled with stories in every line and real value you can use. Tossing them out is a waste because there are smart ways to recycle and give these boards new life all over the house. Folks into fixing up their homes or doing cool DIY projects will spot hidden gems in this wood. Plus, using old wood saves millions of trees each year. Keep reading to find out how to turn these vintage boards into something awesome and good for the planet.
This article offers a wide range of practical ideas for how to repurpose and reuse old hardwood flooring in stylish and functional ways. You will find project examples, prep and safety tips, finishing advice, and pointers on how to match reclaimed wood to your decor. If you want a deeper reference for specific projects see repurpose hardwood flooring for additional examples and links to suppliers.
Why use old hardwood boards in home decor
Reclaimed hardwood has three big advantages for home projects. First, the character that comes with age is hard to reproduce. Nail holes, mellowed tones, and patina give furniture and accents a look that feels lived in. Second, reusing boards usually costs less than buying new solid hardwood for small runs of material. Third, choosing reclaimed wood lowers waste and can be part of a more resource conscious approach to decorating.
Beyond those broad benefits there are aesthetic reasons to choose reclaimed planks. Tones tend to be more varied than modern veneer options. Grain is often tighter and harder species were commonly used on older floors. Those traits mean reclaimed pieces wear well and take finish in appealing ways.
Preparing reclaimed flooring for projects
Good preparation speeds work and improves final results. Start by removing any remaining nails and staples. A magnetic bar can help pick up metal fragments and keep your workspace safe. Next check for old finishes. If the boards were finished with shellac or varnish you may need chemical strippers or sanding to create a surface that accepts stain or new finish.
Test a small section for lead if the floor is very old. Lead based finishes were common decades ago. A simple test kit gives quick results. If lead is present follow local rules for removal and wear proper respiratory protection. In all cases use a dust mask rated for fine particles when sanding.
Tools and supplies you will commonly need
Projects range from a few hand tools to power tools. For most DIY repurposing work you will want these basics on hand.
- Claw hammer or pry bar for removing boards
- Pliers and nail puller for fastener removal
- Sander and sanding discs ranging from coarse to fine grit
- Circular saw or jigsaw for cutting boards to size
- Drill and countersink for making pilot holes
- Water based or oil based finish depending on desired look
- Wood glue and stainless steel screws for assembly
For more advanced joinery a table saw or router will expand what you can build. If you are new to power tools consider borrowing equipment or joining a community workshop for access and safety guidance.
Furniture projects that work well with reclaimed planks
Large pieces highlight the patina and grain of old hardwood. A few project ideas include benches, coffee tables, dining tables, and console tables. These projects can be simple and quick or more involved depending on joinery and finish choices.
Tables and benches
Use longer planks for table tops and shorter cutoffs for inlays. A simple approach is to glue several boards edge to edge then clamp until dry. Add a plywood backing if you want to reduce movement. For support use metal legs or a cross base. Benches are forgiving and a great first furniture project since they do not require perfect symmetry.
Desks and console tables
When building desks aim for a flat, stable top. Fill gaps with a thin strip of hardwood and sand smooth. If you prefer a modern look keep edges straight and finish with a clear matte varnish. For a more rustic appearance leave minor gaps and highlight them with a pigmented filler that matches the wood tones.
Smaller decor projects for fast impact
Small projects let you transform material quickly and produce useful items for the home. These projects are ideal when you have short lengths of board or offcuts from larger tasks.
Picture frames and mirrors
Create frames by cutting boards into narrow strips and mitering the corners. The worn edges of reclaimed wood give frames instant character. Use a rabbeted backing to seat glass or a mirror. A quick finish with tung oil or a wipe on poly protects the wood without hiding its texture.
Coasters, trays and cutting boards
Coasters and small trays are great for using thin strips. For cutting boards prefer harder species and glue pieces face grain to face grain. Finish with a food safe oil followed by beeswax. Keep a heavier finish on trays and decorative pieces to guard against spills.
Wall and architectural uses
Reclaimed flooring makes attractive wall treatments when applied as paneling or accents. Use full boards on a feature wall to create a focal point or cut boards into thinner strips for a shiplap look. For a scaled effect lay boards in a herringbone or chevron pattern to bring motion to a room.
Wainscoting and headboards
Wainscoting built from old boards adds texture at a modest cost. Nail strips to a plywood backer and then secure the assembly to studs. For headboards glue and screw planks to a frame and float the assembly behind a bed for an instant statement piece.
Backsplash and stair risers
Hardwood can be used as a backsplash when sealed properly. Use a durable finish rated for moisture and clean the surface regularly to reduce staining. On stairs attach boards to the riser face to add interest. Use hidden fasteners or countersunk screws plugged with matching wood to make fasteners less visible.
Finishing and protecting reclaimed wood
Finish choices determine look and upkeep. A natural oil finish brings out grain and darkens wood slightly. Water based varnishes dry clear and resist yellowing. Polyurethane is durable for surfaces that will see heavy wear. Test finishes on scrap pieces before applying them to a final piece.
When sanding work through grits and remove dust between coats. For high traffic items apply at least two top coats and buff between coats with a fine pad to improve adhesion. For pieces exposed to moisture consider sealing all faces of the wood to reduce cupping and movement from humidity changes.
Budgeting, sourcing and matching wood
Costs vary depending on how much salvage is needed and if boards require extensive processing. Salvaged boards sourced from a local demolition will often be the most affordable. Reclaimed lumber suppliers sell sorted and planed material at a higher price but with fewer surprises.
To match pieces use a color wheel approach when choosing stains and finishes. Warm toned woods pair well with brass and leather. Cooler toned planks look good with metal fixtures and glass. If you want a uniform look pre stain all pieces together before final assembly.
Maintenance tips to keep items looking great
Regular dusting and quick cleanup of spills extends the life of reclaimed wood projects. For finished surfaces avoid abrasive cleaners which remove finish. Use felt pads under heavy items and reposition decor occasionally to prevent uneven wear. For outdoor pieces choose exterior rated finishes and expect periodic reapplication as weather affects the top coat.
If a piece develops scratches a light sanding and recoat can refresh it. For deeper damage consider cutting a small patch from leftover boards and inlaying that section in place of the damaged area. This keeps repair work consistent in grain and tone with the original material.
Repurposing old hardwood flooring is a practical way to add personality to a home and reduce waste at the same time. Whether you choose a large furniture project or a dozen small accent pieces reclaimed planks offer a range of possibilities for many rooms. Safety and proper preparation go a long way toward a successful result. Start with a single small project to gain comfort with the material and then scale up as you learn techniques for cutting, joining and finishing.
Give one of the projects here a try this weekend. Gather a few boards and basic tools and plan a piece that fits your skill level. Share before and after photos with friends or in a local community group to inspire others. If you need reference material visit trusted sources and suppliers to compare finishes and tool options. Reusing wood reduces waste and creates items that are both useful and attractive. Take action now and turn old planks into something you and your household will enjoy for years to come.